
Capture planning (Thermal Planner)
How sunlight hits a wall changes what a thermal survey can see. Simulate sun and shadow face by face and pick the right time to shoot before you leave for the site.
When you shoot decides
what you get to see.
In this chapter you will learn to
- Work out the best time for each face
- Check neighbour and terrain shadows before you leave
- Tell "direct sun" apart from the recommended window
- Produce a plan sheet and share it with the site
What Thermal Planner is
CRITIR Thermal Planner is a web tool that takes an address and simulates sunlight and shadow for each face of a building (east face, south face, and so on), so you can work out the time window that suits an infrared façade survey.
Open critir.jp/planner in a browser and start using it right away. It is free and requires no account — you do not need a CRITIR licence. All computation runs inside the browser, and the address you type is never stored on a server.
Thermal Planner covers Japan only, and its interface is in Japanese only. Building geometry comes from Project PLATEAU (MLIT) and the Geospatial Information Authority of Japan, so no building or terrain data is available for locations outside Japan.
Detecting delaminated tiles and render on a façade with infrared relies on solar heating creating a temperature difference between sound and detached areas. That makes when you shoot the single biggest factor in the quality of the result.
- Faces pointing in different directions get sun at different times — the best moment for an east face and a west face can be half a day apart
- In cities, a neighbouring building's shadow covers only part of a wall, and that uneven heating is a common source of misdiagnosis
- In mountainous areas, terrain shadow keeps a wall dark long after the calendar sunrise
Discovering this after you arrive means going back. Thermal Planner exists so the decision is made before you leave.
Why the time of day matters so much
The sun travels from east in the morning, through south at midday, to west in the evening. So each face of a building gets its sun at a very different time: the east face is lit early, while the west face only catches the sun in the afternoon. On the same building, the best moment to shoot can be half a day apart from one face to the next.
Finding delaminated tiles with infrared means letting the sun warm the wall so that a temperature difference builds up between sound and detached areas (the mechanism is explained in the thermal analysis column). A wall does not warm up the instant the sun reaches it — the difference grows after it has been in the sun for a while.
That is why Thermal Planner adds up, for each face, the sunlight received over the previous three hours, weighted by how squarely it strikes the wall (low, glancing sun counts for less), and takes the moment where that total peaks as the recommended time. It is also why the recommended window starts a little after the sunlit band and carries on after the sun has gone.
Opening it
| Route | Action |
|---|---|
| From a browser | Open critir.jp/planner |
| From CRITIR | The 点検計画ツール (Capture planning) button at the top right of the project list screen — it opens in your default browser |
The basic flow
1. Search for an address
The search box accepts either a Japanese address or latitude,longitude (for example 35.689550,139.691720). The button searches from your current position (your browser will ask for location permission).
If the address matches several places, candidate buttons appear below the search box; clicking one re-runs the search there.
2. Click the target building in the 3D view
Buildings around the search point are shown in 3D. Click the building you are going to survey and its exterior walls are split into faces, which become the subject of the simulation.
- Changing the capture date (撮影予定日) recomputes everything for the sun path on that day
- The 地図 / 航空写真 toggle switches the ground between a map and aerial imagery
- Switching the target building or the date keeps the camera where it is, so you can compare
Flick through candidate dates
Because the camera stays put, switching only the capture date lets you compare how shadows fall from exactly the same angle. Handy for asking "if we go next week instead, does the neighbouring building's shadow clear the wall?"
3. Read the recommended windows on the timeline
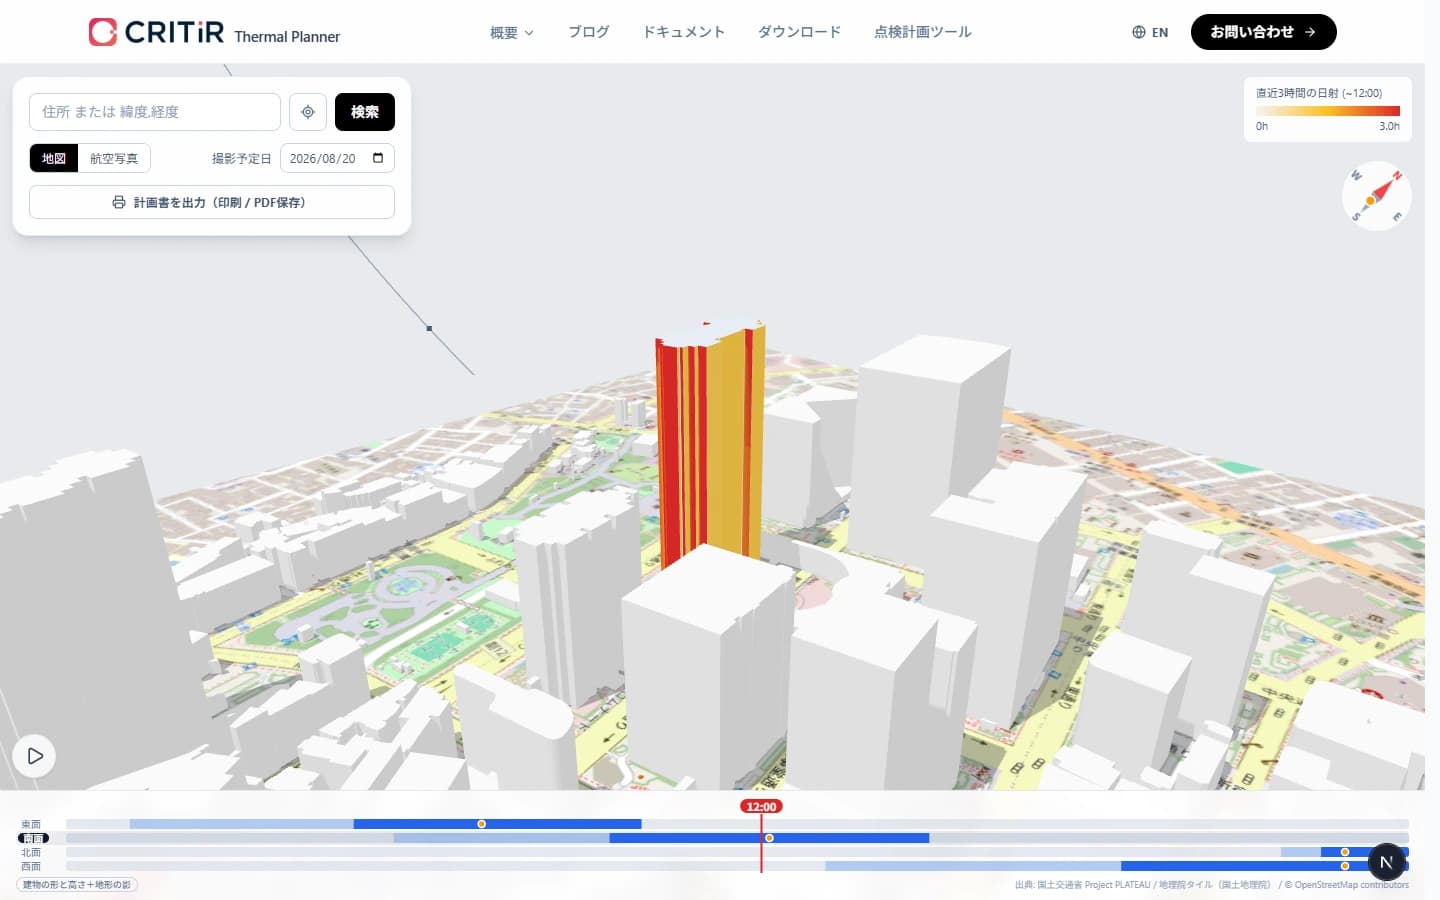
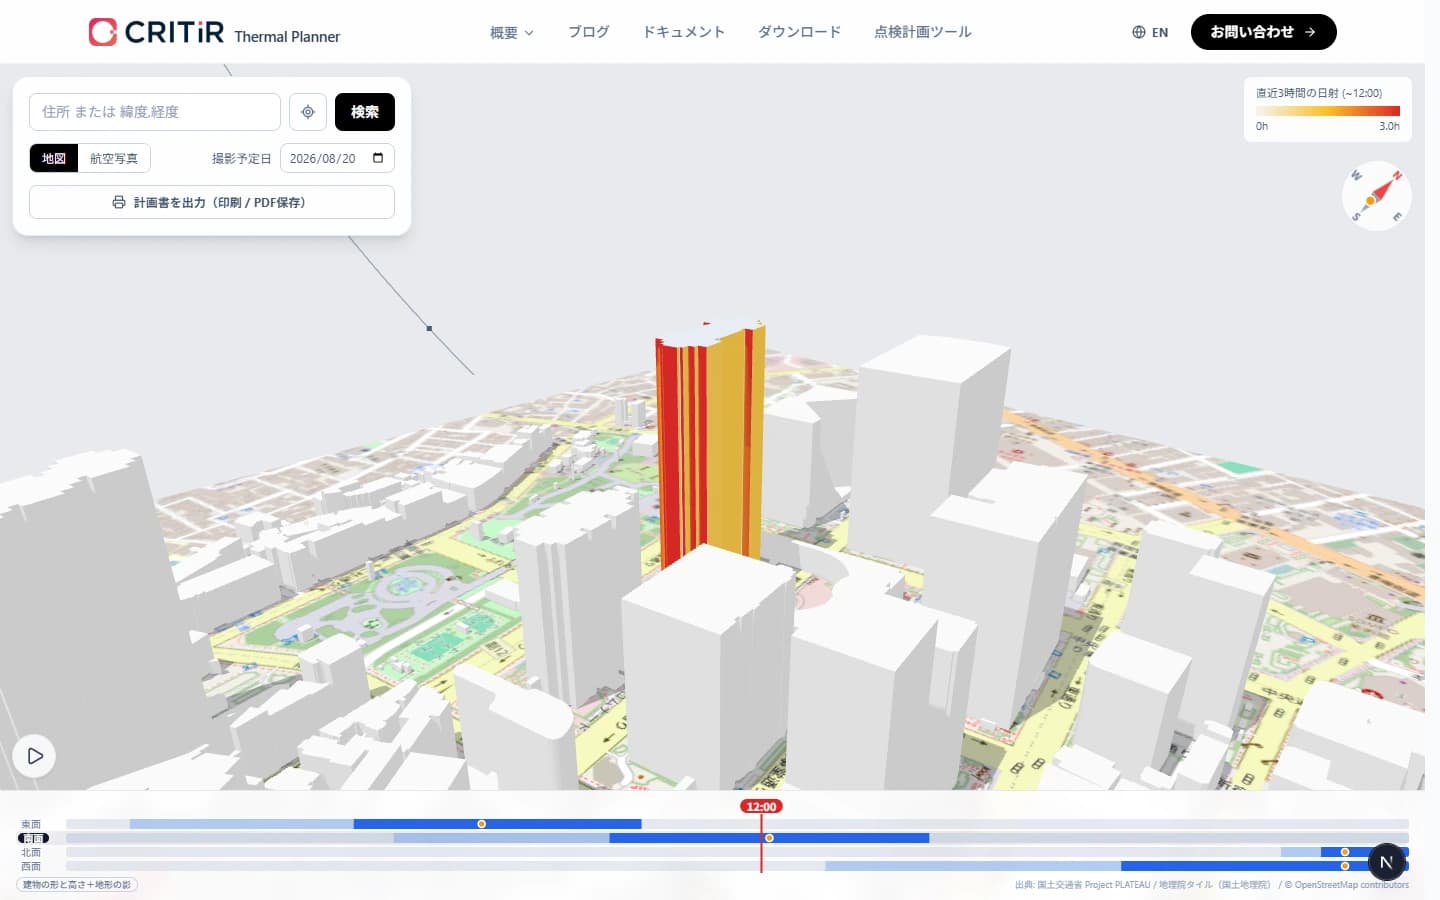
The bar along the bottom of the screen is a per-face timeline for the day.
| Element | Meaning |
|---|---|
| Light band | The face is in direct sunlight |
| Solid band | The recommended window — the heat in the wall is at its most usable |
| Dot | The recommended time — conditions for this face are at their best |
| Red vertical line | The time currently being displayed |
Drag the bar to move through the day and watch the shadows in the 3D view follow. The button at the bottom left plays the day back from sunrise to sunset.
Watch when a shadow clears the wall
In built-up areas a neighbour's shadow can still fall across part of a wall inside the recommended window. Fast-forward the day with , or drag back and forth across the recommended band, and you can see exactly when the shadow slides off the wall.
The legend at the top right explains the wall colouring in the 3D view: how much sun the wall has received over the previous three hours. White means no sun, red means it was lit for the whole three hours. The compass on the right shows the sun's azimuth and elevation at that moment.
4. Produce the plan sheet
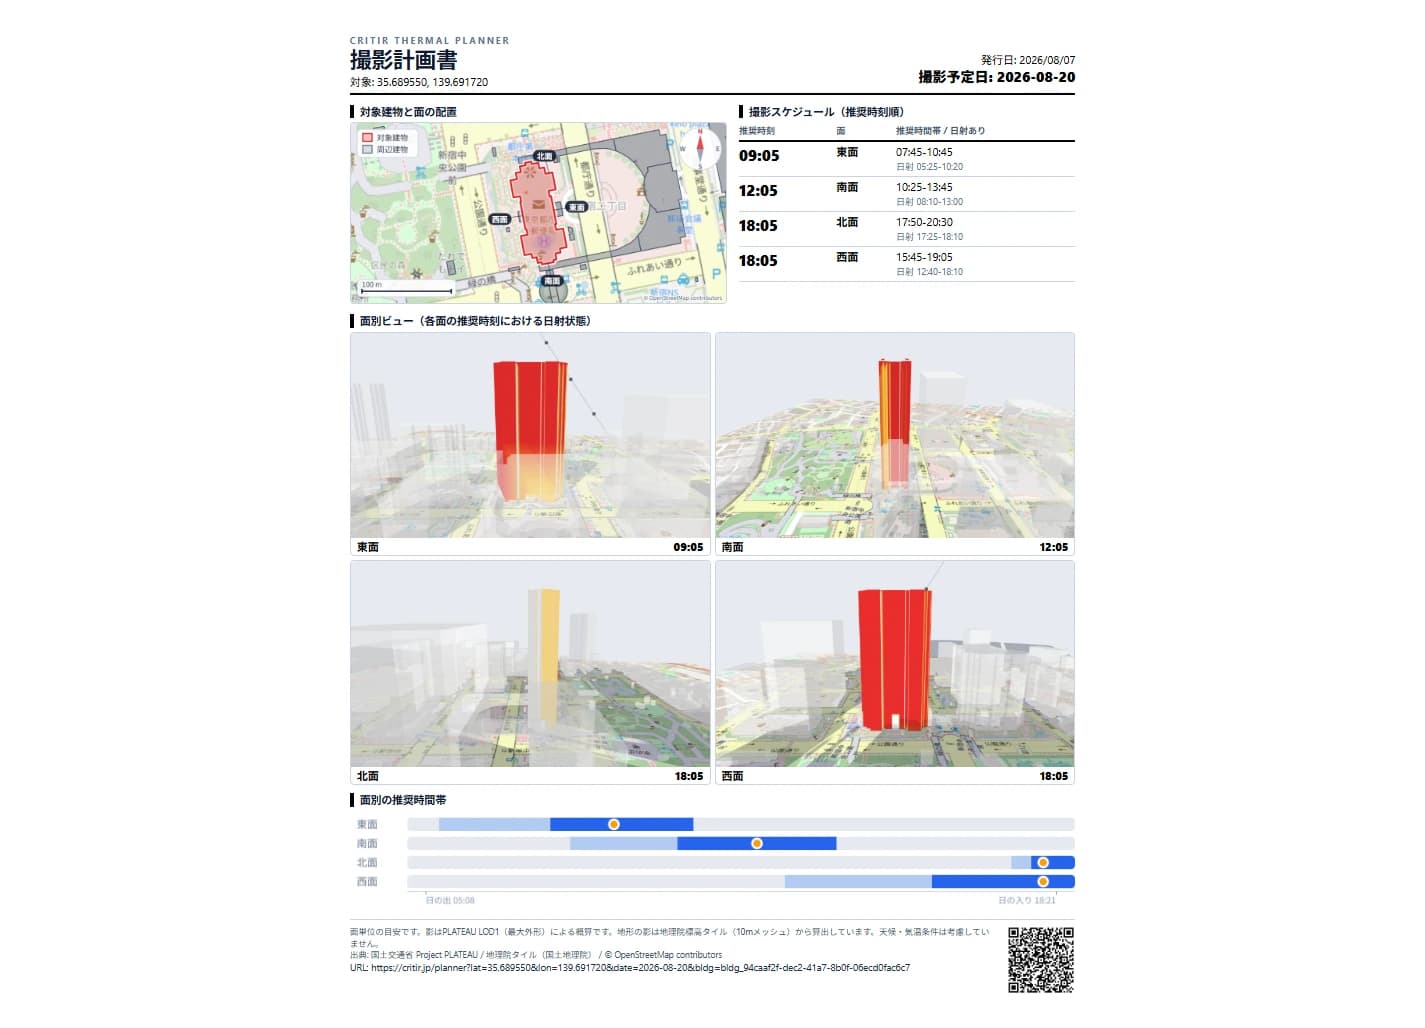
The plan sheet comes in two formats. Both are a single A4 portrait page with identical content (times, figures and tables).
- 計画書(印刷 / PDF) — print it or save it as PDF from your browser's print dialog
- PowerPoint — downloads an editable .pptx file, so you can rewrite text, annotate the per-face views (scaffolding, access routes and so on), or reuse the sheet in your own material
It contains:
- An overhead plan of the target building — surrounding buildings, face labels, north arrow and scale bar
- A capture schedule ordered by recommended time, listing each face's recommended time, recommended window, and the hours it has any sun
- Per-face views — each face seen head-on, in the sunlight state at its own recommended time
- The full per-face timeline
- A QR code and URL, so the same screen can be reopened on site
Reading the recommended window
The timeline and the plan sheet give two figures per face.
| Figure | Meaning | When to use it |
|---|---|---|
| 日射あり (hours with sun) | When direct sun actually reaches the face, with the shadows of the building itself, its neighbours and the terrain already subtracted | Use this to compare one face against another |
| 推奨時間帯 (recommended window) | When the face is warm enough to shoot | Use this to pick the time you actually go |
The recommended window carries on for a while after direct sun ends. A wall does not warm the instant the sun reaches it, and it does not cool the instant the sun leaves. Direct sun is also when uneven heating is most likely, so aiming for the residual heat just after the sun has left a face is a recognised approach on site.
This is why a plan sheet can read「推奨時間帯 15:45-19:05 / 日射 12:40-18:10」, with the recommended window ending later than the sun. It is not an error.
The recommended window expresses how good a time is relative to that same face. You cannot compare faces by the length of the band. A north face that gets very little sun still gets a band. To compare the faces themselves, look at the length of the "hours with sun" figure.
Each row of the timeline and the plan sheet is one representative wall per compass octant — where several walls share a direction, the longest one represents them. If the representative face gets no sun but another wall facing the same way does, the plan sheet notes this (「※同方位の別壁面には日射候補あり」).
Data sources and accuracy
Available data varies by location, so what went into the calculation is shown at all times at the bottom left of the screen and on the plan sheet.
| Label on screen | Source of building shape | Neighbour shadows | Terrain shadow |
|---|---|---|---|
| 建物の形と高さ+地形の影 | PLATEAU 3D city model (LOD1) | Computed | Computed |
| (area not covered by PLATEAU) | GSI building outlines — real shapes, but no height | Not computed | Computed |
| 地形の影のみ(建物データなし) | Eight synthetic faces raised at the search point | Not computed | Computed |
| 日照のみ | As above | Not computed | Not computed |
In areas PLATEAU does not cover, a dialog explains this right after the search, and the same note is printed at the top of the plan sheet — so it reaches someone who only ever sees the printout.
Terrain shadow is derived from the GSI elevation tiles (10 m mesh), by computing the ridge elevation in every direction from the site.
What the tool does not account for
- Weather, air temperature and humidity — there is no sunlight under cloud. Check the forecast for the day separately
- Fine building detail — PLATEAU LOD1 is a maximum-envelope block model, so shadows cast by eaves, balconies and rooftop structures are not reproduced
- Reflections — glare bounced off neighbouring glass is not modelled
Treat the output as a per-face guide accurate to roughly ±30 minutes.
Sharing a plan
The URL records the search point, the capture date and the target building, so sharing the URL reproduces the same plan on someone else's screen.
https://critir.jp/planner?lat=35.689550&lon=139.691720&date=2026-08-20&bldg=...The QR code on the plan sheet points at the same URL. Take the printed plan to site, scan the code, and the same 3D view opens on a phone. (Opening from a shared link skips the first-run guide.)
Related
Plans and features
The difference between LITE and PRO, and which features require PRO
Project management
Manage hundreds of infrared and visible photos from drones or handheld cameras — of façades, solar arrays or other structures — as one set per face, then filter them and thin out duplicates by location.