
Same-location search
Click one point on an image, ortho or 3D model to list every photo that shows that spot. Includes an illustrated look at how candidates are chosen and ranked.
Every photo of that one spot,
lined up for you.
In this chapter you will learn to
- Find every photo that shows the spot you clicked
- Search from images, orthos, or the 3D model
- Find photos that show a whole measurement
- Compare candidates side by side to double-check
What is same-location search?
Same-location search finds every image in the project that shows the exact spot you clicked, and lists them for you.
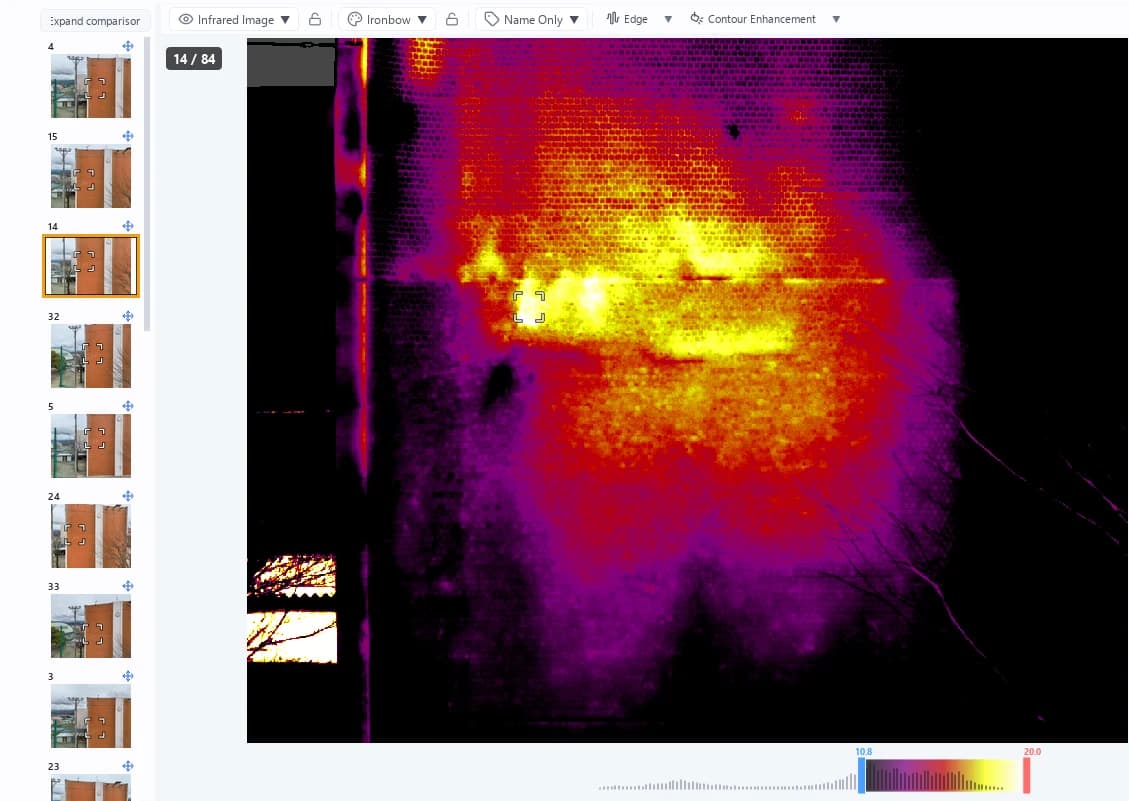
1 The spot you clicked 2 Photos showing that spot (better views at the top) 3 Expand and Compare
Hunting through hundreds of drone images by eye to find "the photo that shows this delamination" is slow. Same-location search turns that into a single click:
- Compare an anomaly you found against shots taken from a different angle or distance
- Find an image that captured the same spot closer up (at higher resolution)
- Cross-check whether a thermal anomaly is really heat, and not dirt or a reflection
- Pick the single best shot for your report
Launching
Turn on the Same-location search button in the tool icon bar at the left edge of the window.
Same-location search is a PRO plan feature. See Plans and features for details.
Prerequisites
The project must have image linking (SfM, 3D reconstruction) already run, because the feature resolves the 3D position of the pixel you clicked and reprojects it into every other image.
Image linking runs when you generate an orthomosaic or a 3D model from Process ▾ → Image Linking, Ortho, and 3D Generation. If you click an image in a project where it has not been run, the results area tells you so.
How does CRITIR find photos of the same spot?
Once image linking has run, CRITIR knows where each photo was taken from, which way it faced, and how wide its field of view was. Resolve the clicked pixel to a position in 3D, and all that is left is to check, photo by photo, whether each camera can see that point.
Photos where the point falls outside the frame, photos taken from behind the surface, and photos where another structure blocks the view (when a 3D mesh exists) are left out. Because the infrared camera has a narrower field of view than the visible one, photos where no temperature is available for the point are dropped too.
The photos that remain are scored on how head-on they look at the surface, how large the spot appears, and how close it is to the center of the frame. A photo shot from far away at a steep angle is not thrown out — it simply lands lower in the list.
How to use
- Turn on the Same-location search button
- Click the spot you want to investigate in the image
- The images showing that spot appear in a single column on the left of the window
A marker is drawn on the spot you clicked. The top of the results area shows Source: (image name) and what is being searched for, such as Target: selected point. Click somewhere else to search again.
To finish, press the button again or right-click on the image.
While the mode is on, zooming with the wheel and panning with a left drag work as usual. Dragging to move the view does not register as picking a spot.
Starting from the right-click menu
Instead of pressing the button, you can right-click the spot you want to inspect on an image, an orthomosaic or a 3D model and choose Find Same Location from the menu. Same-location search turns on automatically and the search starts right away at the spot you right-clicked. The result is the same as turning on the button and clicking.
| Where you right-click | What is searched for |
|---|---|
| On an image | The single point you right-clicked |
| On a measurement in an image | The whole shape of that measurement (as in Searching for a measurement). On a measurement that is projected from another image, the single point you right-clicked |
| On an orthomosaic (including on a measurement) | The single point you right-clicked |
| On the surface of a 3D model (including on a measurement) | The single surface point you right-clicked |
When you right-click a measurement, Find Same Location appears in the measurement menu alongside items such as Show Source Image.
In the following cases Find Same Location does not appear, or choosing it does not start a search:
- While same-location search is on, right-clicking an image or orthomosaic ends the search instead of opening the menu (in the 3D view the menu still appears while it is on)
- While a measurement tool is selected on an image, right-clicking releases the tool
- The item does not appear on a crack candidate in an image, on the other image in compare mode (8), or where camera frames overlap on an orthomosaic
- In the 3D view, the item does not appear off the model surface (such as on the background) or while the Point Cloud display is selected
- On the STANDARD plan, choosing it shows the PRO plan guide
- It is ignored while a previous search is still being processed. If Expand comparison is open, the comparison is closed before the search starts
- If image linking has not been run, for example, the results area shows the same message as when you click with the button on (see When nothing is found)
Reading the list
| Item | Meaning |
|---|---|
| Order | Sorted by how well the spot is captured. The higher an image is, the more head-on, larger, and closer to the center the spot appears |
| Number | The same image number as in the image list — not a rank |
| Marker | The thumbnails also mark the spot with a corner bracket |
| Orange double frame | The source image of the search. It stays marked while you switch to other images |
| Green frame | The image currently shown in the viewer |

The order combines three terms: how head-on the surface is viewed, how many pixels the spot occupies (resolution), and how far it sits from the edge of the frame. Every image that meets the conditions is listed — the count is not truncated.
For the report, start at the top of the list
The list is sorted by how well the spot is captured. When you can't decide which photo to put in the report, open the top candidate first — it is usually the large, head-on shot.
Switching images
Click a thumbnail to switch to that image. The display mode (infrared, overlay, and so on) is restored from whatever was saved for that image.
The marker keeps pointing at the same 3D spot as you switch images, and the results stay on screen, so you can work down the list and compare candidates.
Using it alongside measurement
You can keep the results on screen while using the measurement tools. While a measurement tool is selected, clicks go to the measurement instead, so spot picking pauses; it resumes once you finish the measurement or right-click to release the tool.
Searching for a measurement
While same-location search is on, clicking a measurement's line, frame or label searches for images that show the whole shape of that measurement rather than a single point. Hovering a measurement shows a hand cursor and the hint "Click to search for images showing this measurement". The results area reads Target: measurement (name), and each thumbnail draws the outline of the measurement projected into that image.
- Lines and areas are not collapsed to their center; the outline and interior are sampled and the candidates merged
- Clicking the empty interior of an area still searches for that single point, as before
- If the measurement has no 3D shape (it cannot be projected into other images), the message "Could not determine the 3D shape of this measurement" appears and the mode falls back to picking a point
Searching from an ortho image or 3D model
You can also search from a generated ortho image or 3D mesh. Display it, enable Same-location search, and click the place you want to inspect. The results list shows the source images that capture that location.
You can also right-click the place and choose Find Same Location (see Starting from the right-click menu).
The image linking information corresponding to the displayed ortho image or 3D model must be available. If the 3D position cannot be determined, a message appears. Try selecting another location.
Expand to compare
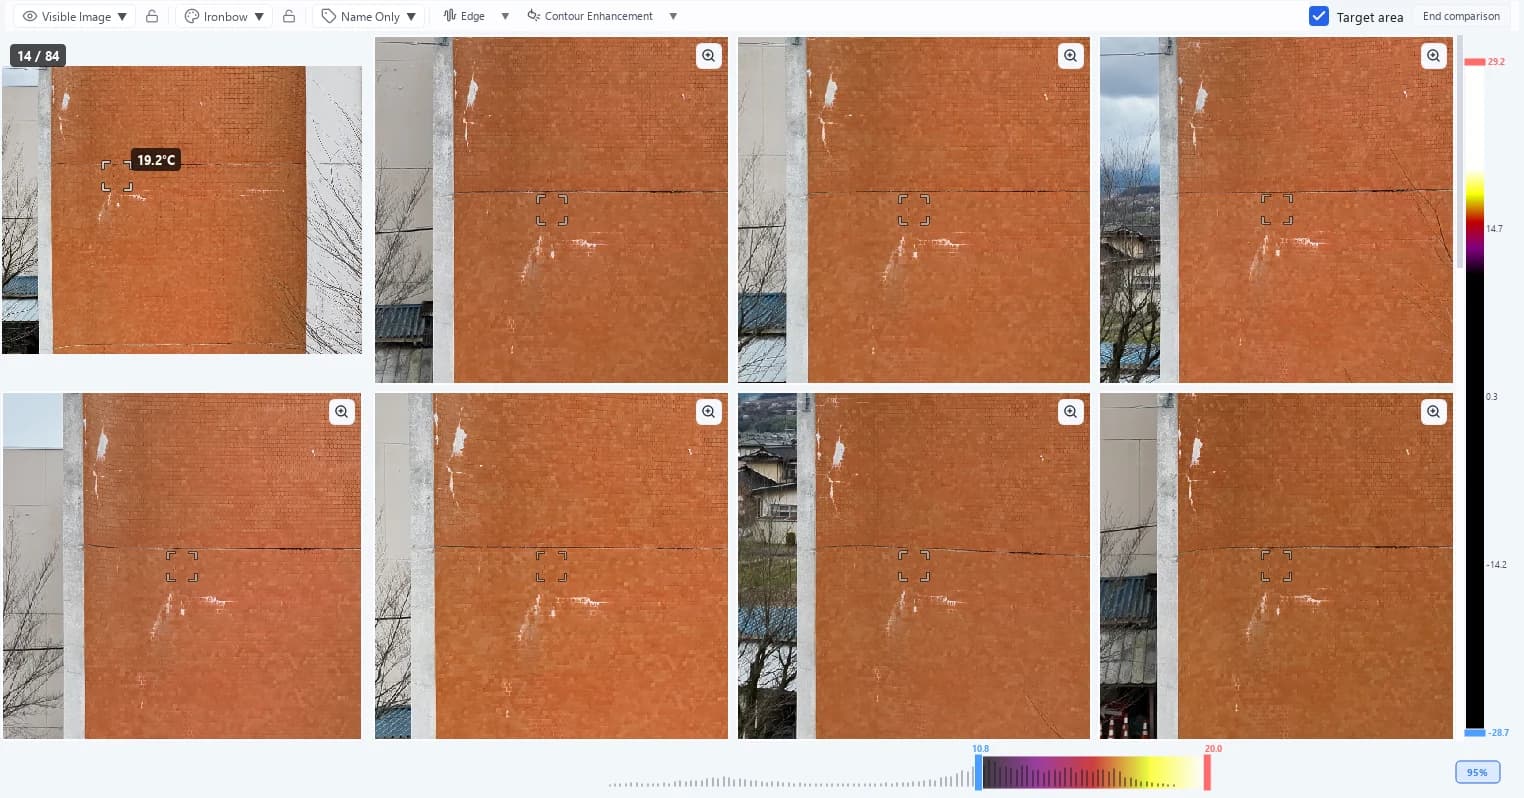
Press Expand comparison in the results area to view the source image and the candidates side by side inside the main window. No separate window is opened.
| Position | Content |
|---|---|
| Top left | The regular viewer with the source image open. You can measure there with the measurement tools as usual |
| Right and bottom left | A grid of candidate images, laid out automatically in 2–4 columns depending on the window width and image count. Scroll to reach every candidate |
Drag the divider to change the split. When the grid has several rows, you can also drag the bottom edge of the source image to change the height split.
| Action | Description |
|---|---|
| Click a tile | Selects that image. The search source and target stay unchanged |
| Double-click / Expand | Shows only that tile, enlarged within the grid. Back to list restores the grid |
| Open in main view | Opens that image in the main viewer (also available from the right-click menu) |
| Wheel | Scrolls the candidate list. Ctrl+wheel zooms the image (while a tile is expanded, the plain wheel zooms too) |
| Around target | On: crops the view around the target. Off: shows the whole image (right end of the toolbar) |
| End comparison | Returns to the search screen (right end of the toolbar) |
The temperature range, alarm thresholds, color palette and the infrared / visible / zoom switches are shared with the existing toolbar and bars. No extra temperature bar or palette control is added for the comparison, and the display range and alarm thresholds remain independent as usual.
Double-check anomalies in visible light
Switch the display to the visible image while in Expand comparison, and you can review many photos of the same spot at once. It is a quick way to make sure a thermal anomaly isn't just dirt or a reflection.
While comparing, the information panel on the right collapses automatically (use its toggle to show it again). When you end the comparison, the zoom, view position and panel state return to what they were before. Moving to another image or ending the search also closes the comparison.
Tile status
When the target position cannot be located in an image, the tile explains why.
| Text | Meaning |
|---|---|
| Visible only (badge) | The spot lies outside the infrared field of view. Check it in the visible image |
| Partly out of range / not projectable | Part of the target falls outside the image or in an area that cannot be projected |
| No zoom image / Cannot locate the target on the zoom image | In zoom display, the zoom photo is missing or the position on it cannot be determined. The whole image is shown |
| No infrared image / No visible image | The image lacks that modality, or it could not be loaded |
| Cannot locate the target (showing the whole image) | Alignment information is missing or no correspondence could be found. The image stays in full view |
| Visible-to-infrared alignment is unavailable (showing the full image) | The visible/infrared alignment of that image could not be read |
| Mapping zoom images to infrared is not supported. Check the visible image | The position on the zoom photo cannot be carried over to infrared. Switch to visible display |
If the search source was a point on an orthomosaic or a 3D model, the comparison still opens inside the image viewer. Because there is no source photo, the top-left viewer keeps showing the image that was open in the image viewer. No empty source column is shown; only the candidate images are laid out.
Why an image may be excluded
If you wonder why an image is missing — or why an unrelated one shows up — these are the filters that apply.
| Condition | Detail |
|---|---|
| Outside the field of view | Images where the spot falls outside the camera frame are excluded |
| Back of the surface | Images taken from behind the wall plane or cylinder are excluded |
| Occlusion | When a 3D mesh exists, images where another structure hides the spot are excluded |
| Infrared coverage | An infrared camera has a narrower field of view than the visible one, so images that show the spot in visible light but carry no temperature there are excluded |
| Feature correspondence | Images where image linking matched no feature points near the spot are excluded |
These filters only remove images that clearly do not show the spot. When the information needed to judge (a 3D mesh, a target plane, the infrared alignment conditions) is not available, the image is deliberately kept in the list rather than risk dropping a valid candidate.
When nothing is found
| Message | Cause and fix |
|---|---|
| Run image linking to search for images showing this spot | Image linking (SfM) has not been run. Run Process ▾ → Image Linking, Ortho, and 3D Generation first |
| Could not determine the 3D position of this spot. Try another location. | The depth cannot be resolved — sky, a mirror surface, and the like. Click somewhere with texture, such as a patterned wall |
| No image shows this spot | No image met the conditions above. Try a different spot |
Related
- Set link — pairs up different sets (a previous inspection, another time of day) for comparison. Same-location search works within the images registered by image linking
- Measurement tools — a measurement made on the image you found is reprojected onto the other images as well
Set link
Link two sets with four pairs of matching points and compare photos of the same spot side by side — for year-over-year or time-of-day comparisons.
3D model
Generate 3D models of buildings and structures such as retaining walls and tunnel portals from photos, map infrared temperatures onto them and inspect them in 3D — with an illustrated look at triangulation.